How to Validate Your Milgard Windows Warranty: Key Steps and Tips
When investing in home improvements, the durability and performance of windows play a critical role in overall homeowner satisfaction. Among the many choices available, window warranties can significantly influence purchasing decisions and long-term costs. According to a recent report from the National Association of Home Builders, windows account for approximately 15% of a home’s total energy efficiency, making the validity of any warranty associated with these products essential for homeowners.
Understanding the intricacies of the Milgard Windows warranty is crucial for ensuring that you maximize your investment and secure your home against future costs. Research indicates that homeowners who actively manage their warranties can save an average of 25% on maintenance and repair expenses over the lifespan of their windows. This not only highlights the importance of validating warranties but also emphasizes the steps necessary to ensure that warranties remain intact through their coverage period. By familiarizing yourself with the key steps and tips for validating your Milgard Windows warranty, you can protect your investment and ensure your home remains energy-efficient and visually appealing for years to come.

Understanding Milgard Windows Warranty Basics
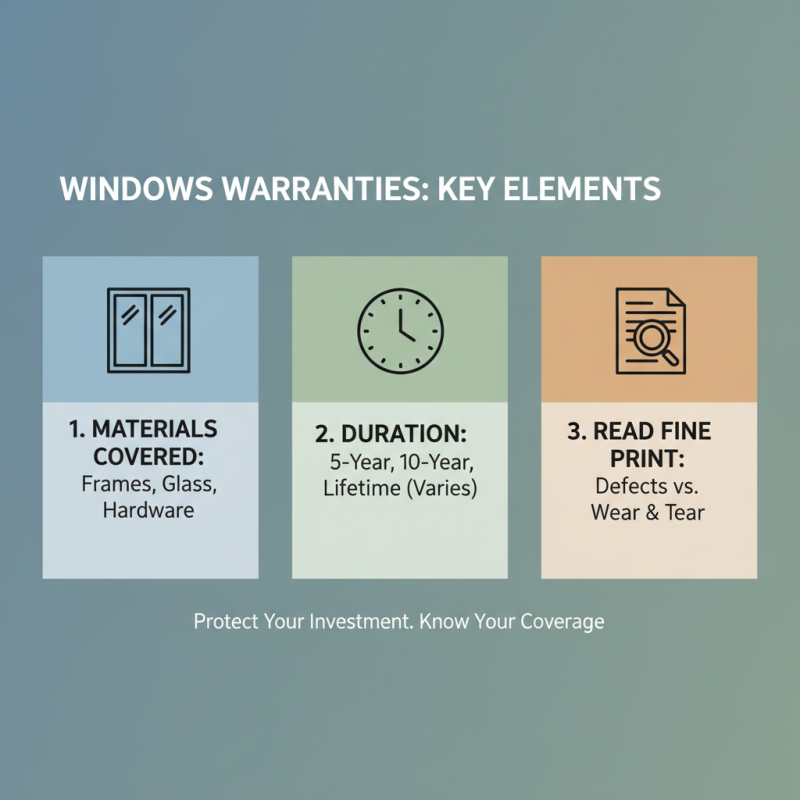
When it comes to understanding windows warranties, there are essential elements that homeowners should be aware of. Most warranties will outline the materials covered, such as frames, glass, and hardware, as well as the duration of coverage. Typically, warranties may span from a few years up to a lifetime, depending on the product. It's crucial to read the fine print to know what is included and what constitutes normal wear and tear versus material defects.
Additionally, the warranty process often requires registration within a specific timeframe after installation. Homeowners should keep documentation such as receipts and installation dates to ensure smooth claims processing. Understanding the steps to validate the warranty can also involve contacting customer service or authorized dealers for any necessary information regarding claims procedures. Knowing how to navigate these basics can empower homeowners to effectively manage their warranty and ensure long-term protection for their windows.
Gather Necessary Documentation for Warranty Validation
When validating your window warranty, the first step is to gather all necessary documentation that supports your claim. This typically includes the original purchase receipt, which serves as proof of purchase and establishes the warranty period. Make sure the receipt displays the date of purchase, the names of both the buyer and seller, and a detailed description of the windows purchased. Having this at the ready can make the validation process much smoother.
Additionally, compile any relevant information linked to the installation of the windows. This can encompass installation contracts and any correspondence with the installer. Such documentation can be pivotal in demonstrating that the windows were installed in accordance with the manufacturer's guidelines, which is often a requirement for warranty claims. Keep these documents organized and accessible, as they are essential in validating your warranty effectively and addressing any potential issues that may arise during the validation process.
Check Eligibility Requirements for Your Milgard Windows Warranty
When validating your windows warranty, the first step is to ensure that your windows meet the eligibility requirements set forth by the manufacturer. Typically, warranties cover defects in material and workmanship for a specific period, often ranging from 10 to 20 years, depending on the type of window and glass used. According to industry reports, about 90% of homeowners replace their windows primarily due to energy efficiency concerns, making it crucial to confirm that your windows not only comply with the warranty conditions but also adhere to energy performance standards.
To check your warranty eligibility, start by locating your proof of purchase and the installation date, as these documents are essential for warranty validation. Additionally, familiarize yourself with specific conditions such as proper installation by licensed professionals and regular maintenance requirements. Industry data highlights that regular maintenance can extend the life of windows significantly, with some homeowners reporting up to 30% longer use when maintenance checks are conducted bi-annually.
**Tips:** When reviewing your warranty, make detailed notes about the specific terms and conditions related to eligibility. If you're unsure about any aspect, contact the customer service line for clarification. Furthermore, always keep a file with all relevant documents—including installation records and maintenance receipts—organized by date to ensure easy accessibility when validating your warranty. This proactive approach not only aids in potential claims but also reinforces your understanding of maintaining your windows effectively.
Milgard Windows Warranty Validation Steps
This bar chart illustrates the average time it takes to complete each step necessary for validating a Milgard windows warranty. The steps include initial purchase, registration, claim submission, claim processing, and claim approval.
Follow the Step-by-Step Process for Filing a Warranty Claim
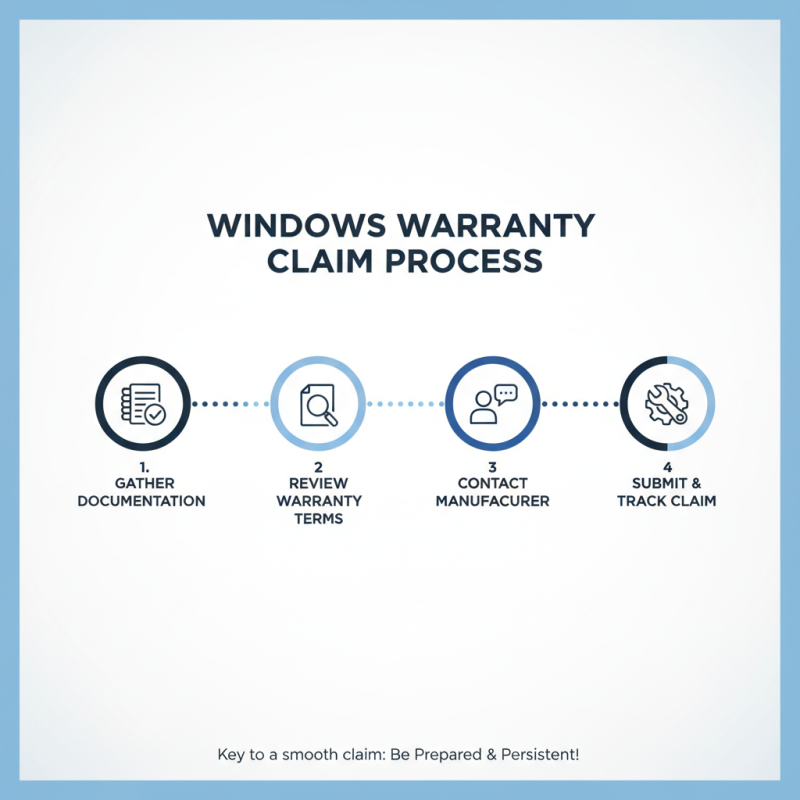
When it comes to filing a warranty claim for your windows, following a structured process can make all the difference. Begin by gathering all necessary documentation, including proof of purchase, installation details, and any previous communications regarding the windows. This documentation will establish your eligibility for a warranty claim and should be easily accessible at the outset. Additionally, take note of the warranty terms that outline what is covered, as well as any specific requirements that need to be met.
Next, contact the customer service department or warranty claims department as specified in your warranty documentation. Be prepared to provide your gathered information, including model numbers and a description of the issue. It's advisable to keep a record of your communications with the company, including dates, names of representatives, and details of discussions. Many manufacturers request that you send in photographs or evidence of the issue, so be sure to take clear images to support your claim. Following these steps will streamline the process and help you effectively navigate the warranty claim, ensuring that you maximize your chances of a successful resolution.
Tips for Ensuring a Smooth Warranty Validation Experience
Validating your windows warranty can seem daunting, but a few key steps can streamline the process and ensure a smooth experience. First, gather your purchase information, including receipts, product models, and installation dates. This documentation will serve as the foundation for your warranty claim, and having it organized ahead of time will save you from potential headaches down the line.
One effective tip is to double-check the warranty details before initiating the validation process. Understanding what is covered, the duration of coverage, and the specific conditions for claims can prevent misunderstandings. It's also helpful to create a checklist of required documents and steps, ensuring that you don't overlook anything crucial. This proactive approach can make your warranty validation seamless and efficient.
Another important aspect is to contact customer service early. Don’t hesitate to reach out to the company’s support team for clarification on any uncertainties you may have regarding your warranty. They can provide insights and confirm what specific information you will need, reducing the risk of delays. By being prepared and informed, you set yourself up for a successful warranty validation experience.
How to Validate Your Milgard Windows Warranty: Key Steps and Tips
| Step |
Description |
Tip |
| 1 |
Locate your warranty information |
Keep a copy of the warranty and purchase receipt together |
| 2 |
Check warranty coverage details |
Review specific coverage and exclusions carefully |
| 3 |
Gather relevant documents |
Organize your purchase documents and warranty |
| 4 |
Contact customer support |
Prepare any questions prior to the call |
| 5 |
Complete any required forms |
Double-check for completeness and accuracy |
| 6 |
Keep track of your warranty status |
Note any confirmation numbers or emails |